Simple Career Any% guide
The best Any% route for new runners.
Before the run
Make sure you've set your game up correctly, read general information and the category rules.
This page is a guide for the simple route, so please read all of it first. It reads in the same order as you perform the run and contains clips for each strat, which I highly recommend you watch. Jump to the Summary for the route only.
This route requires reduced World Level of Detail and the bonus cash from an Underground 2 savefile!
Autosave ON recommended. Create a copy or archive of your set up savefile for easier and faster resets. Make sure to not touch anything outside of options after creating a new alias.
I highly recommend restarting the game if you have entered career before your run. It is possible to invalidate your run by changing the default position of the menus in career.
Don't forget to restart your game if you've changed anything in the options.
Ensure that your Quick Race settings are reset to default. Use the Defaults button on the race options screen.
The run starts from the Main Menu when you first enter Quick Race.
Prologue
Lap Glitch circuit 14, 1, 2, 3 as follows:
Quick Race, Custom Race, Circuit. Switch region left under the map to City. Select Century Square and change Laps to 1 and Traffic Level to None, then Accept. Back out twice to the race selection screen and switch region twice to College - either direction works. Select circuit 1 Ironwood estates, Accept and back out twice. Select circuit 2 Campus Way, Accept and back out twice. Select circuit 3 Highlands, Accept and back out into the main menu. Select Career and Start Career.
Important! If the game shows Continue Career, the run is not valid!
First Lap Glitches example
When you finish the circuit race, restart it and Quit to Career Main Menu, then Continue Career. This skips the cutscene where Razor challenges you to a race, saving about 32 seconds.
Razor cutscene skip example
Sonny
Choose the Volkswagen Golf GTI as your first car.
Start Race 1. Perfect start is between 3-4000 RPM with the stock Golf. At the end of the race, turn around and enter the tuning shop.
Simple Sonny Race 1 turnaround example
Install a spoiler and upgrade to Race Engine. You can open the cart with Start (Xbox), Options (PS) or 4 (keyboard) instead of backing out twice.
Start the chase from Bounty 2. Enter cooldown twice to increase the cop spawn rate.
You need all milestones: 2 Tags and Pursuit Time over 2 minutes but under 4 minutes. Earn at least 2950 bounty before you escape, which requires at least a triple combo and an extra kill (3+1) with an exactly 2 minute chase.
Sonny chase examples
- Double cooldown strat
- Full Sonny chase & camera
Complete the Camera (Photo Ticket) Milestone (130 km/h)81 mph.
Race 2: During the sprint race, tune Aerodynamics +5 after passing the entry to the stadium. You can close the tuning menu instantly with Start (Xbox), Options (PS) or 4 (keyboard).
Sonny Race 2 tuning example
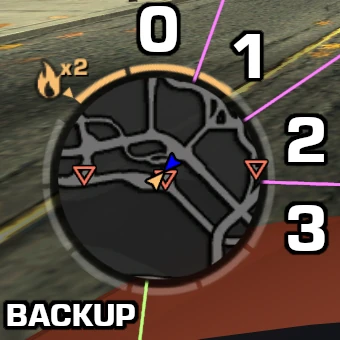
Race 3, Challenge the Boss
Do NOT boss skip and choose the second and third markers. Optimally you want the cash marker. Cash and pink slip allows you to buy the transmission upgrade on Baron.
Taz
Without the cash marker:
Jump to Safe House, Car Select and sell Sonny's Golf. Resume Free Roam and enter the tuning shop on your right.
With the cash marker:
Enter the tuning shop you just spawned outside of.
Once you are in the tuning shop:
Upgrade to Race Transmission, Pro Suspension and Pro Nitrous. Tune +5 Ride Height, then complete Camera 4 Milestone (the first Photo Ticket, 150 km/h93 mph).
Start the chase from Bounty 2. Enter cooldown once to spawn a second cop quickly. You need all milestones: 1000 Bounty, 15000 Cost to State and 3 infractions. Generate at least 2000 CTS then destroy two cop cars in combo on a pursuit breaker and escape.
Optimally you want to use the radio tower at the police station, then escape towards Camera 5 (145 km/h)90 mph as shown below. Be careful though, you can softlock the game if you trigger the camera immediately after the chase!
If you didn't generate enough bounty on Sonny, enter cooldown twice and destroy 3 cop cars in combo instead.
Manual Taz chase example
Jump to Safe House, back out to the main menu and Lap Glitch circuits 4 and 5 in any order. Resume Career and Free Roam.
If you haven't done it already, complete Camera 5 Milestone (the second Photo Ticket, 145 km/h90 mph).
Check your total bounty and subtract 50k from it. This is your overshoot. Subtract your overshoot from 18k to get your Izzy bounty target: 18000 – overshoot.
Complete Races 1, 4, 5 and 6, then Challenge the Boss.
Boss skip after the second race against Taz by clicking the right side of the continue button. About fifth of the button is boss skip, so no need to be precise.
Pick the performance (junkman) marker for suspension and the second or third bonus marker. Cash or pink slip allows you to buy the transmission upgrade on Baron.
Boss Skip example
Izzy
Upgrade to Pro Tires and install the Junkman Suspension from the backroom.
Complete Camera 5 (195 km/h)121 mph, then Lap Glitch circuit 6 and switch region left to All Regions. If you have Sonny's or Taz's car, sell one of them.
Start Race 2 from the Safe House and try to get cops during the race. Be careful at the bridge near the end as the cops slow down a lot.
If you have cops, turn around and trigger backup quickly. If you don't have cops, restart the race on the finish line, Jump to Safe House and start Race 7.
If you didn't get cops on either race, start a chase from Bounty 2. Wait until you reach heat 2 before triggering the backup because the timer is 1 minute shorter.
You need 2 Izzy milestones: 8 Tags and a chase over 4 minutes. Required bounty is your Izzy target or 18000.
Izzy chase examples
- Video 1
- Video 2
- Video 3
- No Blocks
Complete Vic Camera 4 (175 km/h)109 mph if your total bounty is below 138 500 after the chase.
Complete Race 1 and turn left after the finish to hit Vic Camera 5 (170 km/h)106 mph.
Start Vic Race 1, Quit to Free Roam and turn around to hit Izzy Camera 4 (185 km/h)115 mph on the left if your total bounty is below 149 000.
Izzy Camera 4
Race 5, then start Race 6 if you haven't completed both Races 2 and 7.
Izzy drag example
Do a Quick Escape by starting a chase from Bounty 1. Destroy the cop with the radio tower and enter Safe House while in cooldown.
Izzy Quick Escape example
Lap Glitch circuit 7 and Challenge the Boss from the Safe House.
Boss skip and skip markers by clicking the Choose Markers button.
Baron
Upgrade to Pro Engine, Super Pro Suspension and Super Pro Nitrous. If you have more than 45000 cash, also upgrade to Pro Transmission.
Start the chase from Bounty 2. If you have at least 2 filled bars of heat, enter cooldown once. Double cooldown if 3 bars, or triple if 4 or more bars of heat.
Trigger the backup when you have 3 empty bars of heat towards heat 3 by destroying 8 cop cars (3+5 or 4+4). This way you reach the next heat level before the backup arrives.
Baron heat bars
You need at least 3 Baron milestones: 10000 Bounty, 30000 Cost to State (CTS), over 5 minutes and 4 Infractions for Big Lou. Required chase bounty depends on your roadblock milestones:
| Blocks | Bounty |
|---|---|
| 0 or 1 | 147k |
| 2 or 3 | 117k |
| ≥4 | 90k |
Unless you completed Baron's 4 roadblock milestone during the chase, you need to complete a camera after Race 2.
Baron chase examples
- Video 1
- Video 2
Lap Glitch Lap Knockout (KO) 6 by setting Opponents to 1 and Traffic Level to None. Return to Free Roam.
Start Race 2, which has Baron Camera 7 (225 km/h)140 mph after it if you turn left at the end of the road.
Complete Races 1, 5, 7 and 8 in any order, then Challenge the Boss.
The drag race against Baron can be quite difficult as there is little room for error. You need to nail the start and stay ahead of Baron. If he overtakes you, it's over unless he crashes out. You need to switch lanes to the right before the end of the split road, otherwise you are going to total on the water barrels!
If you have Race Transmission, you want to either skip perfect start or short shift into second gear to avoid overheating the engine. With Pro Transmission, you can perfect start using the rev drop method.
Boss skip and skip markers by clicking the Choose Markers button.
Baron drag examples
- Pro Transmission
- Race Transmission
Jewels
No upgrades on Jewels. Complete Camera 6 (238 km/h)148 mph, then start Race 3, which has Earl Camera 7 (225 km/h)140 mph directly after the finish line. Beware of blind traffic at the last speedtrap! You can avoid them by going on the pavement on the left.
Lap Glitch KO 8 and start Race 4 from the Safe House. If no cops, start the chase from Bounty 2.
You need at least 3 Jewels milestones: 18 Tags, over 6 minutes and 5 Infractions. To complete infractions you need either Hit and Run or Speeding (241 km/h)150 mph. Required bounty depends on your roadblock milestones:
| Milestones | Bounty |
|---|---|
| none | 322k |
| 4 blocks | 287k |
| 6 blocks | 276k |
| 4+6 blocks | 241k |
You might still have the 2 roadblock milestone from Big Lou, which gives 30k bounty. Jewels has two additional cameras for 24k bounty each (48k total).
Jewels chase examples
- Video 1
- Video 2
- Video 3
- Video 4
- Video 5
- Video 6
Complete Races 1, 2 and 6, then check your total bounty in the blacklist menu. Challenge the Boss if it's available.
| Bounty | To do |
|---|---|
| ≥1156k | Camera 7 (238 km/h)148 mph |
| ≥1134k | Quick Escape |
| ≥1110k | Cam 7 & QE |
Jewels' drag is easier than Baron's, but you still need a good start to guarantee the win. However, this race has a broken traffic lua script which causes 3 vehicles on the side of the road to not move. In very rare cases the script does work, so be careful when driving past the stadium as the news van could total you with ease.
Due to the slight incline, it is more difficult to get a clean start. Be careful with Race Transmission, you can easily overheat your engine on the finish straight.
Boss skip and pick the junkman marker for transmission.
Jewels drag examples
- Pro Transmission
- Race Transmission
Ming
Upgrade to Super Pro Engine, Super Pro Transmission, Ultimate Tires and install the Junkman Transmission.
Tune +1 Handling and +2 Nitrous, Lap Glitch KO 11, then start the chase from Bounty 2.
You need at least 3 Ming milestones: 22 Tags, over 7 minutes and 4 Spikes or 10 Roadblocks. You want additional bounty for JV. Recommended targets (more is better):
| Milestones | Bounty |
|---|---|
| none | 850k |
| 8 blocks | 800k |
| 10 blocks | 750k |
You might still have the 6 roadblock milestone from Earl, which gives 46k bounty. Ming has two additional cameras for 46k bounty each (92k total).
Ming chase examples
- Video 1
- Video 2
Start Race 7, which has Ming Camera 5 after (180 km/h)112 mph. Keep some nitrous and take a wide line in the hairpin after the finish, so you can use your nitrous during the corner exit.
Ming Camera 5 example
Complete Races 1, 4, 6, 8, 9 and 10. If you missed a milestone and/or low on bounty and already completed Race 6, start Kaze Race 2 and Quit to Free Roam for Ming Camera 6 (173 km/h)108 mph.
Skip perfect start on Ming's drag to reduce wheelspin at the start. You can get really fast opponents. If you can't win, quit the event and start it again for different racers.
Ming drag examples
- Clip 1
- Clip 2
Take note of your current total bounty, then Lap Glitch Circuit 16 before Challenging the Boss.
Determine your JV bounty target during the long cutscene: 3172k – total bounty. At least 325k is required for milestones.
Boss skip and skip markers by clicking the Choose Markers button.
JV
Upgrade to Ultimate Suspension, Ultimate Nitrous and Ultimate Brakes.
Complete Camera 7 (245 km/h)152 mph, then start the chase from Bounty 2. Try to get Speeding (241 km/h)150 mph and Hit and Run infractions early on.
You need at least 3 JV milestones: 325k Bounty, 150k CTS and 6 Infractions. Required bounty is your JV target. 28 Tags milestone is worth 100k bounty.
JV chase examples
- Video 1
- Video 2
- Video 3
Quick Escape if you have less than 3852k total bounty, then Lap Glitch Circuit 18 and KO 14.
Complete Camera 5 (290 km/h)180 mph. If you need more bounty and/or milestones, start Race 10 and Quit to Free Roam for Camera 6 (265 km/h)165 mph.
Complete Races 2, 3, 5, 6, 7, 8 and 9. Restart Race 7 on the finish screen if you get cops.
If you are missing bounty, Race 8 has Ming Camera 7 (255 km/h)158 mph after it across the boardwalk for 46k, otherwise complete Webster Cameras for 60k each (180k total).
Challenge the Boss.
Skip perfect start on JV's drag like on Ming. JV can easily catch you in the second half if you are too slow. If you get a really good start, you can be too fast to pass under the truck on the right side, so I recommend keeping a bit of your nitro.
JV drag examples
- Clip 1
- Clip 2
Boss skip and pick the junkman marker for engine.
Bull
Upgrade to Ultimate Engine, Ultimate Transmission and install the Junkman Engine.
Complete Camera 5 (313 km/h)195 mph, but go up the ramp on the side and turn right for Camera 7 (266 km/h)165 mph.
Bull Camera 5 & 7 example
Complete Race 12, then start Race 6, which has Race 11 after it on the hill, which has Race 2 after it on the left.
Bull drag and free roam race start examples
- Bull drag
- Race 11 after Race 6
- Race 2 after Race 11
Your heat level has been set to 5. Start the chase from Bounty 2.
You need at least 2 Bull milestones: 200k CTS and 8 Spikes or 12 Roadblocks. You want additional bounty for Razor. Required bounty is at least 2.7M, but 3M or more recommended.
Bull chase examples
- Video 1
- Video 2
- Video 3
- Video 4
Lap Glitch Circuit 23, then start Race 1, which has Camera 6 after it (220 km/h)137 mph. If you got an additional milestone and have enough bounty, you can skip the camera.
Complete Races 8, 9 and 10, check your total bounty, then Challenge the Boss.
If you have 8068k or more bounty, you can do minimum Razor with 850k. Otherwise calculate your Razor bounty target: 8918k – total bounty.
DO NOT BOSS SKIP, it crashes the game. Skip markers by clicking the Choose Markers button.
Razor
No upgrades or Lap Glitch on Razor.
Complete Camera 7 (320 km/h)200 mph, but turn left immediately for Camera 6 (225 km/h)140 mph, then start Race 10 from free roam, which has Ronnie Camera 5 after (225 km/h)140 mph.
Razor Camera 7 & 6 example
Jump to Safe House and start Race 3. If no cops, start a chase from Bounty 2.
You need at least 2 Razor milestones: 850k Bounty and Under 2 minutes. Focus on hitting your bounty target and try to complete the chase in under 2 minutes. If your chase was longer, do a quick escape, but the second cop could block your escape at the safe house.
Razor chase examples
- Video 1
- Video 2
- Video 3
Start Race 11, which has Camera 5 after it on the right (241 km/h)150 mph. You need to slow down before the finish to make the turn.
Complete Races 1, 2 and 4. If you don't have enough bounty, the next races have backup cameras after then.
Start Race 5, which has JV Camera 6 after it on the road (265 km/h)165 mph.
Start Race 8, which has Earl Camera 5 (240 km/h)149 mph then Ronnie Camera 6 (255 km/h)158 mph down the road, or Ming Camera 7 (255 km/h)158 mph on the right side just after the finish.
Start Race 9, which has Ronnie Camera 7 after it (285 km/h)177 mph.
Challenge Razor:
The third race has a barrier with an opening at 60% where you can cut some of the track. Go past the refinery, turn left, go straight then turn right and return to the intended route.
Razor drag and Forest Green OOB examples
- Drag 1
- Drag 2
- Forest Green OOB
Final Pursuit
Without the glitch:
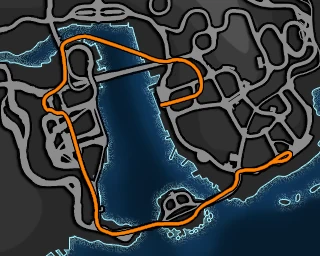
Keep your speed up, avoid spikes and watch out for rhinos. Make your way to the Bus Station in Rosewood where you can go up the ramp on the right side to confuse the cops. Here you can wait in relative safety until about 4:20 when you want to start driving towards the other end of Rosewood. Do NOT drive past the western Donut shop before the timer hits 5:00, otherwise you are too close for Mia's call! Build up speed and make the jump over the bridge.
Glitchless Final Pursuit examples
- Video 1
- Video 2
With the glitch:
Quit to Main Menu as soon as the UI appears and Continue Career - this gives the M3 ultimate nitro, making the Final Pursuit much easier.
Do NOT hit the pursuit breaker at the start and turn around by going under the wooden overpass. Turn left to the split road, drive past the beacon and turn right into the Docks. Once the timer hits 20s, roadblocks can spawn, usually next to the beacon or on the bridge. Avoid rhinos if you encounter them.
Turn left after driving past the jets and aim for the garage door at the left side exit. If you are using hood or bumper cam, I suggest using Pull Camera Back as you are approaching the garage, then hold Look Behind just before hitting the garage door. If you are using close or far camera, use speedbreaker instead of pull camera. You need the camera to go past the wall to despawn the collision. Make sure your car is angled slightly to the right. If the camera is on the other side of the door, drive into it, should let you past. After you are through, don't go too far, you need to head north and keep looking back to get outside of the garage. Stop looking back once you are out, but don't go right immediately or you end up back in bounds. Get under the road, turn left and follow it until the bridge, where you can drive through the first pillar on the right. Go to the intersection of the tunnel and cross it going east, drive past the bottom of the building on the right and turn 170° right. Avoid the intersections and cross the roads close to the middle, otherwise you'll hit invisible collisions. Line up in the middle of the parallel roads and aim for the chimney of the boat. If you did everything correctly, you'll start falling then hit an angled collision and after a few spins your car should be tilted with the correct angle. Drive up a bit, under the river, under Riverside Drive and Petersburg Interchange and aim for the bottom of the trees next to Hwy 99. Slow down slightly and turn left to get back in bounds. Be careful, if you flip your car here, you have to restart! Build up speed and go for the jump. Minimum speed required is 185 km/h115 mph. You'll lose speed when going on the bridge, which can be mitigated by activating speedbreaker.
Final Pursuit with Out of Bounds example
Summary
Prologue
Lap Glitch Circuits 14, 1, 2, 3. Restart the circuit on the finish screen, quit and continue.
Sonny
Buy Golf, Race 1 & turn around for shop, spoiler and engine. Chase: double cooldown, all milestones, 2950 bounty. Cam, Race 2 & Tune aero +5, Race 3, Boss, no skip, no junkman.
Taz
Sell Sonny's car if no cash. Upgrade transmission, suspension, nitrous and Tune +5 ride height, Cam 4. Chase: one cooldown, all milestones, Cam 5. Lap Glitch Circuits 4, 5. Races 1, 4, 5, 6 and Boss. Boss skip & junkman.
Izzy
Upgrade tires and junkman, Cam 5, Lap Glitch Circuit 6, Race 2 from Safe House for Chase: quick backup, 8 Tags, 4 minutes, 18k. Vic Cam 4, Race 1 & Vic Cam 5, Quit Vic Race 1 for Cam 4. Races 5, 6. Lap Glitch Circuit 7 and Boss. Boss and marker skips.
Baron
Upgrade engine, (transmission), suspension, nitrous. Chase: (cooldowns), backup at 3 empty bars, 5 minutes, 4 infractions. 147k if 0-1 block, 117k if 2-3 blocks, 90k if 4 or more blocks. Lap Glitch KO 6. Race 2 (Cam 7), Races 1, 5, 7, 8, Boss. Boss and markers skips.
Jewels
Cam 6, Race 3 & Earl Cam 7, Lap Glitch KO 8, Race 4 from Safe House for Chase: 18 Tags, 6 minutes, 5 Infractions. 322k if no block milestones, 287k if 4, 276k if 6, 241k if 4+6, 2 is 30k. (Cam 7), Races 1, 2, 6, QE, Boss. Boss skip & junkman.
Ming
Upgrade engine, transmission, tires and junkman, Tune +1 handling and +2 nos, Lap Glitch KO 11. Chase: 22 Tags, 7 minutes, 4 Spikes and/or 10 blocks, 800k or more bounty. Race 7 & Cam 5, Races 1, 4, 6, 8, 9, 10, Lap Glitch Circuit 16, check total bounty, Boss, JV target (3172k – total bounty). Boss and marker skips.
JV
Upgrade suspension, nitrous, brakes, Cam 7. Chase: speeding + hit and run for 6 Infractions, 150k CTS, JV target bounty or at least 325k. QE, Lap Glitch Circuit 18, KO 14, Cam 5. Races 2, 3, 5, 6, 7, 8, 9, Boss. Boss skip & junkman.
Bull
Upgrade engine, transmission and junkman, Cam 5 & Cam 7, Race 12, Race 6 -> Race 11 -> Race 2. Chase: 200k CTS, 8 Spikes and/or 12 blocks, 2.7-3M bounty. Lap Glitch Circuit 23, Race 1 & Cam 6. Races 8, 9, 10, check total bounty, Boss, Razor target (8918k – total). NO BOSS SKIP, marker skip.
Razor
Cam 5 & Cam 6 -> Race 10 & Ronnie Cam 5. Race 3 from Safe House for Chase: Razor target or at least 850k under 2 minutes. Race 11 & Cam 5. Races 1, 2, 4. Race 5 (JV Cam 6), Race 8 (Ronnie Cam 6), Race 9 (Ronnie Cam 7), Boss. OOB at 60% on third race.
Final Chase
Chill on Bus Station until 4:20 or Garage OOB, rock, don't flip, jump.